Dashboard Blocks

The Dashboard is a customizable overview page that provides the users with information and links courses and activities. In the following some of the customizable “blocks” will be explained.

After logging into Moodle, you can navigate to the dashboard using the navigation bar at the top.

Default dashboard

By default, the blocks “Recently accessed courses”, “Course overview” and “Timeline” are displayed in your dashboard.

  • Recently accessed courses: This block shows your courses in a most recently visited order. You can navigate to more courses using the arrow buttons.
  • Course overview: In the course overview your courses are displayed based on the selected filters.
    • Filter: By using the dropdown filter you can filter your courses by status, semester or favorites.
    • Search bar: By entering the course name or course number in the search bar you can search directly for specific courses.
    • Sorting: You can sort your courses alphabetically (in descending order) or by last accessed (most recently accessed courses at the top).
    • Layout: The final dropdown menu in the top bar allows you to choose between the different layout options for your course overview: “Card”, “List”, or “Summary”. We find the “List”-presentation to be the most clear and therefore recommend using it. Additionally, at the bottom of the block, you can decide how many courses to display and navigate between them using the arrow buttons.
  • Timeline: The timeline shows activities that require your action. Here you also have different filtering and sorting options.
    • Filter: The activities can be filtered by their due date.
    • Sorting: You can either sort the activities by date or by courses.
    • Search bar: By entering the type or name of an activity in the search bar you can search directly for specific activities.

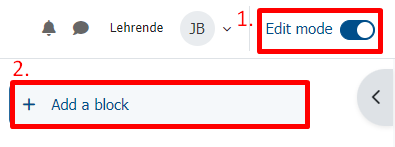
Customizing the dashboard and blocks

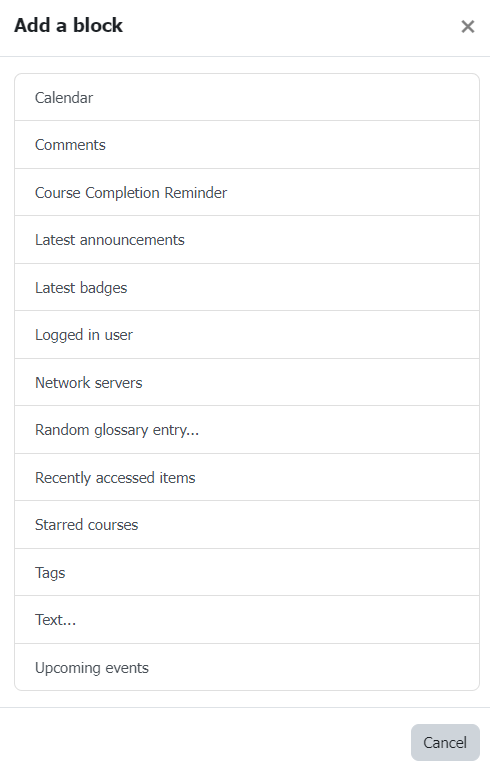
Within the dashboard, you can switch to edit mode by toggling the “Edit mode” slider at the top right.

Adding blocks

Adding Blocks: You can add various blocks at the desired position on your dashboard by clicking “Add a block”. Similarly, you can add blocks to your block drawer, which can be expanded through the gray arrow on the right.

Placementsettings for blocks

Once you are in edit mode, you can edit a block by clicking the “gear icon” in the upper right corner of the block. Some blocks have unique settings. But the placement can be customized for all blocks. There are two types of placement settings: “Where this block appears” and “On this page”. The first setting allows you to set a default region and default weight, so the block will be displayed to other users with these settings. However, lecturers do not have the rights to set blocks for other users' dashboards. Therefore , for personal adjustment, only the section “On this page” is relevant. Here the available settings include:

  • Visible: Determines whether the block is shown to you once you exit the edit mode.
  • Region: Here you can customize where the block is displayed within the dashboard. This setting will override the default region.
  • Weight: This allows you to set a weight, which also overrides the default setting. The weight determines the order of blocks within the respective column. The value -10 places the block at the top while 10 places the block at the bottom.
Block overview
Block overview
  • Upcoming events: This block shows a list of future events, including scheduled dates in the calender, assignment deadlines, or availability dates. You can also access the calender through this block.
  • Network servers: This block provides integrated access to your Mahara profile within Moodle. The block is included by default in your right block drawer.
  • Logged in user: This shows a short profile overview. Through the block's configuration (gear icon), you can select which information to display.
  • Starred courses: This block lists your starred courses. But you can also filter for “Starred” within your “Course overview”.
  • Calendar: Displays events in a calender format. It can show general events (valid site-wide), course events (visible only to course members), group events (visible only to group members), and personal events (visible only to the individual user).
  • Comments: This block allows users to leave comments.
  • Course Completion Reminder: Here existing reminders can be displayed or new reminders can be created.
  • Latest badges: This block shows the latest badges a user has earned.
  • Latest Announcements: This displays the latest announcements. On the dashboard, this block shows announcements from the Moodle administrators.
  • Tags: Within this block a “tag cloud” is displayed. The tags appear larger based on their frequency of use. You can configure the block to display tags within a specific context.
  • Text…: A simple text block where you can freely choose the content upon creation.
  • Random glossary entry…: This block enables a random (customizable) display of single glossary entries from a course's glossary. You can configure whether the shown entry is completely random or follows an order, and how frequently new entries should be shown.
  • Recently accessed items: Here the course materials and activities that the enrolled user has recently accessed are displayed.