Using Videos in Higher Education Teaching

Videos are popular among students, and the possibilities for using video for teaching are diverse. We would like to give you an insight into the didactic considerations and present examples of different uses. Beyond that, we are happy to give you personal and individual advice.

Learn more about the technical implementation of videos for teaching

The Strengths of Videos

One of the strengths of videos compared to other media is that they are illustrative (audio-visual combination). Furthermore, students also value the following characteristics of a video:

  • it can be viewed flexibly in terms of time and place (e.g., in case of illness or overlapping with other courses)
  • it can be stopped and (individual passages can be) viewed repeatedly
  • parts can be skipped (chapter markers help in this case)
  • the playback speed can be changed individually if necessary

Different Forms and Purposes

When using videos for teaching, there are different forms associated with different objectives.

Standard Lecture Recordings

Their purpose is usually the documentation of a course and they are used online as supplementary learning material. They enable the following:

  • the flexibility of study – for structurally disadvantaged students (commuting, job, family) as well as in case of illness or parallel courses
  • a follow-up to courses (e.g., in the case of language barriers for international students or in the case of difficulties in understanding the content specific passages can be viewed and repeated several times)
  • Exam preparation

Examples of different types of standard lecture recordings:

Conclusions from the scientific literature on lecture recordings

Most students find lecture recordings – supplementary to face-to-face lectures – very useful.
The main aim is to repeat course content, especially if students are disadvantaged due to language difficulties, illness, part-time job, family commitments, etc. (Soong et al. 2006; Rust & Krüger 2011).

Lecture recordings do not automatically lead to declining numbers of listeners.
The main reasons given by students for not attending a lecture are illness, one (or more) jobs and parallel courses (Tilmann et al. 2012; Pursel & Fang, 2012; von Konsky et al. 2009; Rust & Krüger 2011; Tilmann et al. 2015).

References:

Soong, S.K.A.; Chan, L.K. & Cheers, C. (2006): Impact of video recorded lectures among students. In Proceedings of the 23rd annual ascilite conference: Who’s learning? Whose technology? Ascilite 2006. Sydney, The University of Sydney. Sydney, pp. 789–793.

Tillmann, A.; Bremer, C. & Krömker D. (2012): Einsatz von E-Lectures als Ergänzungsangebot zur Präsenzlehre. Evaluationsergebnisse eines mehrperspektivischen Ansatzes. GMW Paper.

Pursel B. & Fang H.-N. (2012): Lecture Capture: Current Research and Future Directions. Philadelphia, PA: Schreyer Institute for Teaching Excellence, University of Pennsylvania.

Von Konsky, B.R.; Ivins, J. & Gribble, S.J. (2009): Lecture attendance and web based lecture technologies: A comparison of student perceptions and usage patterns. Australasian Journal of Educational Technology, 25(4), pp.581–595.

Rust, I. & Krüger, M. (2011): Der Mehrwert von Vorlesungsaufzeichnungen als Ergänzungsangebot zur Präsenzlehre (opens in new tab)

Tilmann, A; Niemeyer, J.; Krömker, D. (2015): Flexibilisierung des Studienalltags durch eLectures (opens in new tab)

Educational Videos for Online Teaching

… are usually produced specifically for blended learning scenarios (e.g., flipped classroom) or entirely online teaching. Equally worth is to search for external videos from the Internet and link them. The purpose of educational videos is mostly:

  • the teaching and presentation of course content,
  • to illustrate and to explain learning content (e.g., contexts that would otherwise not be observable > animation, time-lapse, slow motion),
  • to arouse interest and curiosity for a topic,
  • as supplementary learning material (further/deepening) for different levels of pre-knowledge or interest.

Examples of different types of educational videos:


Student Video Productions

so that students are engaged with the content to stimulate the learning process.
For example, the students are given the task:

  • find an example of context XY and show it on video,
  • carry out experiment Z and document it on video,
  • deal with certain content and create a video about it for other students (learning by teaching).

In this way, helpful learning materials can be produced and the students' media competence is improved.

Examples of different student video productions:

Video as a Feedback Tool

  • In situations where students have to “perform” (e.g., training in sports) or for simulations (e.g., teacher training, presentations, and team tasks) it can be helpful for them if these are recorded to be able to reflect on themselves afterwards.
  • To give students individual feedback/correction on their submitted assignments in online teaching settings, it can sometimes be quicker and easier to understand if this is recorded as a short screen recording.

Especially when videos are produced for blended learning scenarios or pure online teaching – for presenting, illustrating and explaining content – it is advisable to think about the concept beforehand and to consider the following didactic design elements.

Also check out our Tips for producing videos & recordings from a technical-organisational perspective!

Brainstorm your ideas for the educational video and clarify initial questions.

Short notes or a mind map are often enough for this. It helps to concretise your ideas and thus provides a good starting point for further production planning (see Tips for producing videos & recordings ).

Make decisions about the concrete design of your video.

These depend partly on the aim of the video and the associated didactic considerations, as well as on the topic (e.g. complexity), the technical possibilities and the time and human resources you have available.

  • What type of production should the video have? (see Technical possibilities of production )
    • A screen recording in which you show prepared presentation slides or develop the content on the screen? Should this recording contain other video footage (e.g. speaker video)?
    • A classic video recording of you explaining the content on the blackboard/ whiteboard?
    • A montage of real video footage?
    • Would you like to include animations, images?
    • A laying technique video in which you sketch or lay down pictures, writing, diagrams on a white surface during your oral explanation?
  • How should the content be structured and presented?
  • What is the common thread?
  • How long should the video be and how should it be structured?
  • Should there be interactive opportunities? Should students actively do something?

An educational video should have a framework in the form of an introduction and an exit to facilitate the mental classification. It is also helpful to summarise the most important points at the end and, depending on the length of the video, also in between.

The introduction can

  • create a content link to other content/learning activities, e.g. to a previous educational video,
  • give a brief orientation of what the video is about in terms of content,
  • make the relevance of the video content clear,
  • arouse curiosity/interest for the video content.

The exit can

  • include a summary of the main points from the video,
  • give a preview of the next steps that relate to the video content, e.g. next (online) face-to-face event, tests, tasks.

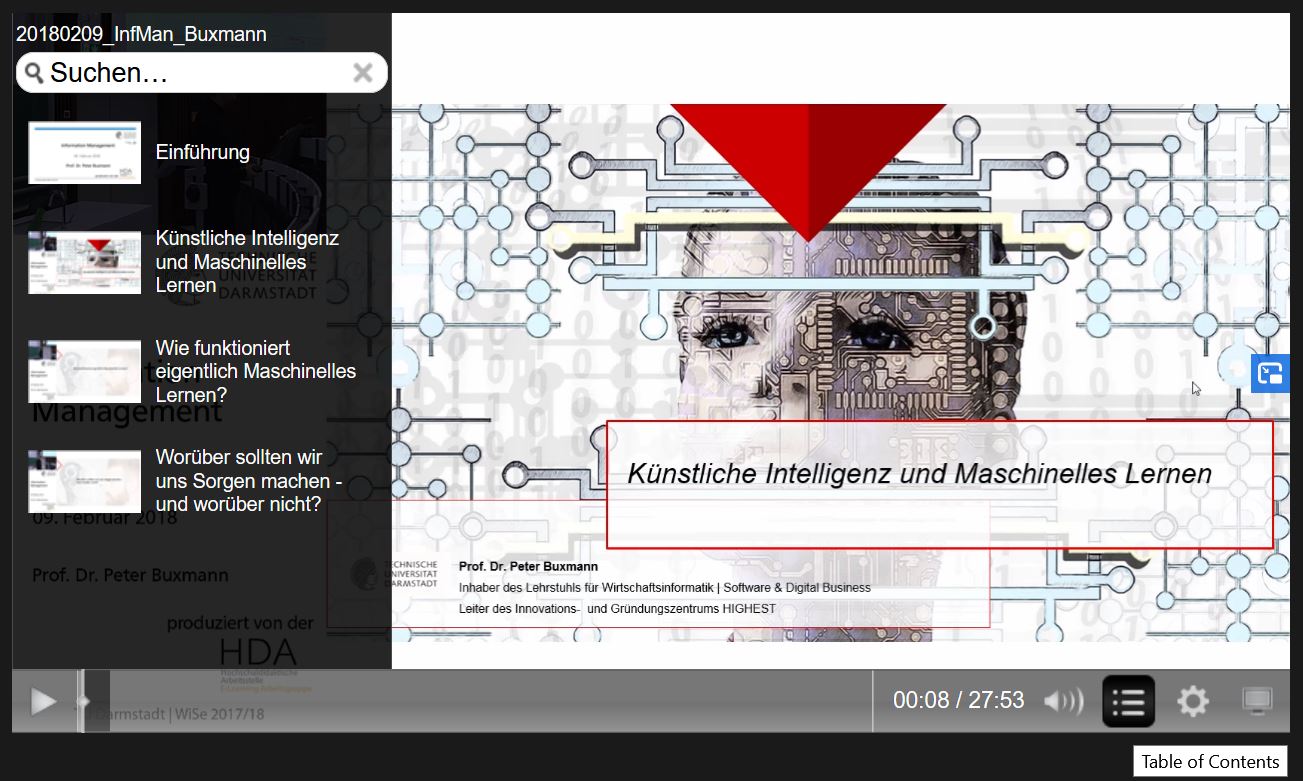
The longer the video, the more helpful are chapter markers that function as a table of contents and thus enable a quick overview of the content as well as targeted navigation through the video.

If you watch the video several times, this makes it easier to “jump in” to the parts that are of interest. It also makes it possible to subdivide chapters that are too long afterwards.

In particular, typical lecture recordings with a length of 60-90 minutes can be made much more learner-friendly, because students can divide the material into practical learning units.

How can chapter markers be created?

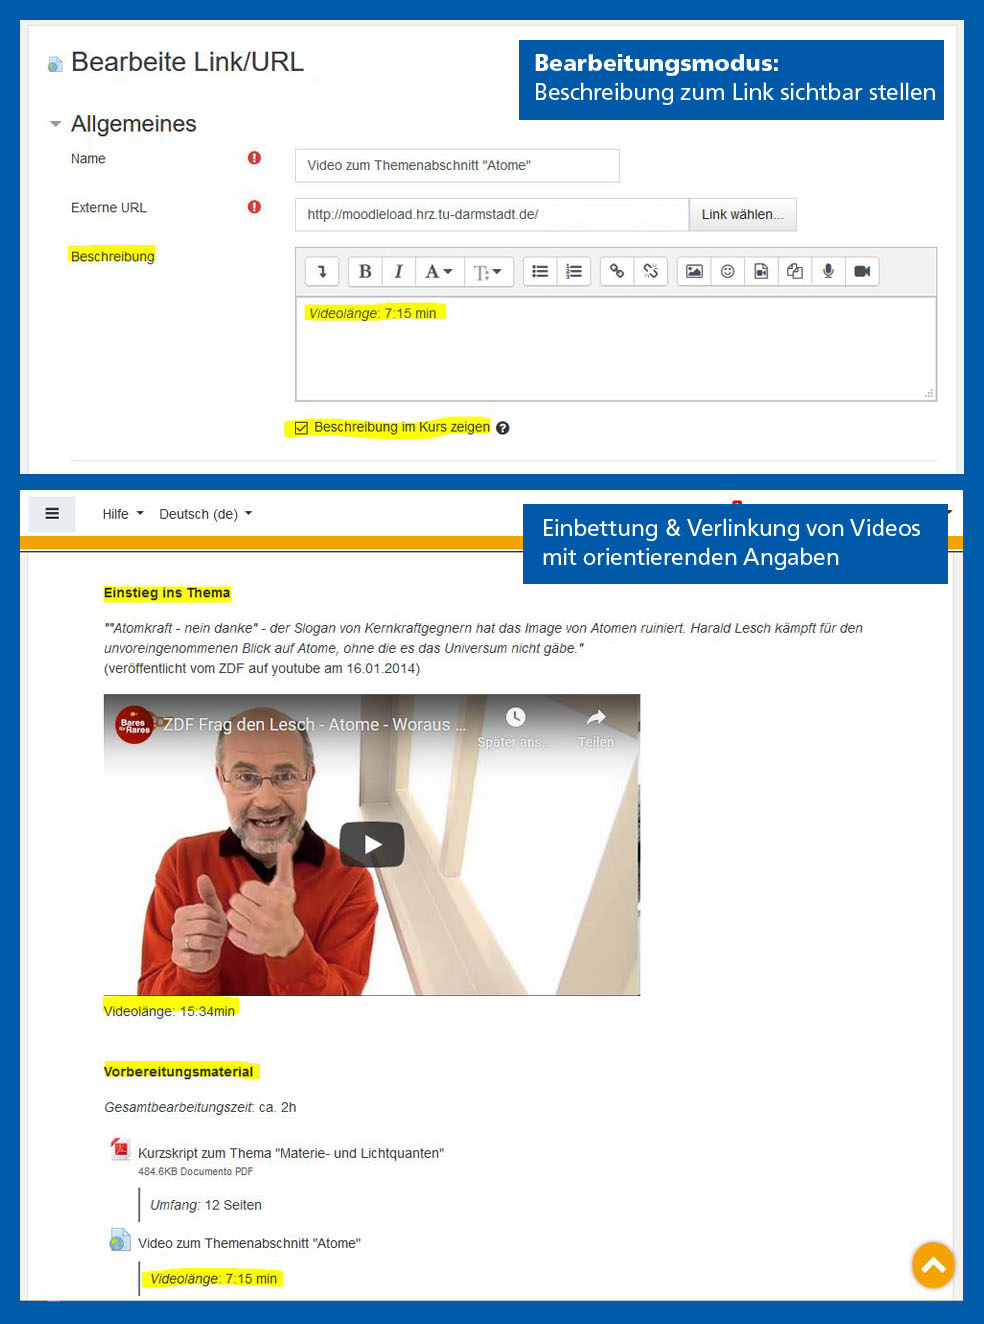
In the screen recording software Camtasia (see Tutorial) or other video editing programmes, so-called time markers can be created using the “Marker” function. These can then be accessed later in the finished video via the table of contents.

Note: If the video is produced as .MP4, the markers are not displayed. For this, the option “with Smartplayer” must be selected when exporting from Camtasia.

Example of a video with a table of contents (produced with Camtasia)

Standard lecture recordings are mostly 90 min long, as they are usually simply the documentation of a lecture that has taken place.

For educational videos that are produced specifically to present or illustrate content, it is recommended to make them significantly shorter than 90 minutes. This is because the human attention span is limited. This recommendation also applies if the videos are produced in the same way as a standard lecture recording (e.g. recording a content presentation with slides as a screen recording).

In principle:

The shorter the better! – Ultimately, this depends on the complexity and amount of content. Ideally, a video deals with one topic and is no longer than approx. 10 – 15 min. For large topics, you should consider if these can be divided into smaller sub-topics and accordingly into several videos.

Note for standard lecture recordings:

If these are recorded as a documentation of the course and subsequently made available in smaller clips, students do not necessarily appreciate this because they expect the recording to be an exact copy of the course (and do not want to miss any content).

Referring to this, the following variants are possible, each of which has advantages and disadvantages. Make the decision consciously according to the content of your educational video and your available resources for the video production.
Variant Advantages Disadvantages When is this variant useful?
person is seen in the video
Example
  • personalisation
  • emphasis on verbal argumentation
  • creates more commitment
  • more effort (camera, light, synchronous sound recording)
  • requirements for clothing, room, setting
  • When it is important to see the person (verbal and non-verbal expression) – e.g., with expressive gestures/ mimic or also use of objects, e.g., Glassboard/ Whiteboard/ Blackboard or machines that are being explained.
  • If the personal reference is important – e.g., the students do not yet know the lecturer or the students should feel that they are being addressed personally (e.g., in an introduction).
  • Ultimately, it is also a question of how comfortable the person presenting feels about acting in front of the camera.
lecturer is not seen in the video
Example
  • visual components receive more attention
  • usually less effort for recording and post production
high demands on sound recording (quality) and speaker (tempo, variation)
  • If visualisations/presentations of the spoken content are in the focus, e.g., illustrative pictures, important key words on slides, notes/calculations/sketches that are worked out.
  • classically with Screen recordings
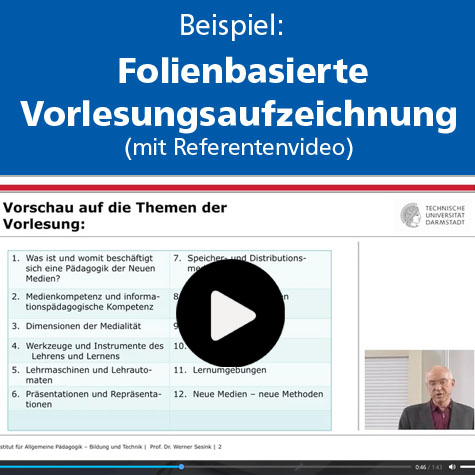
lecturer & presentation/ notes are seen in the video
Example
visual components and the explanatory situation are brought into the correct context of meaning Mistakes in live performances are very difficult to correct afterwards (synchronicity of content, lecturer and sound).
  • Explanation of complex visualization where mimic/ gestures are important
  • classically with Screen recordings
Combinations are also useful – that means during a video, depending on the content, the person presenting or the visualisations (slides etc.) are brought to the foreground Example
  • The lecturer is only shown at times when a personal reference wants to be created, e.g., when starting and ending the video or in between when telling an anecdote/example, etc.
  • “Special”: The use of a Green Screen in video production (part of the equipment in the video recording studio at Campus Stadtmitte), where illustrative content can be transparently inserted behind/next to the person presenting.

Keep an eye on the following:

  • Objectives of your video
    (Are they also clear for the target group?)
  • Clarity
    (appropriate explanations and didactic reduction, terminology)
  • Time structure
    (Break down into sequences, appropriate pace of explanation – not too fast, not too slow, if necessary speak a little slower for complex content).

In addition, the following aspects play a role in the quality rating of educational videos from the students' point of view:

  • formal: presentation, professionalism, length
  • content: amount of information, topic

Simple tips to enhance the didactic value of standard lecture recordings

Lecture recordings can also be used as a basic material in teaching-learning settings in which the content is taught online asynchronously. Standard lecture recordings can be relatively easy prepared didactically for this purpose:

  • Check if the 90min video can be split into smaller thematic clips (10-15min).
  • Add an introduction and an exit/ summary (if necessary, post-produce it as a short video or audio snippet or simply text overlays).
  • In between, fade in questions/ summaries
  • If necessary, set chapter marks (especially if it is kept as a 90min video).

In addition to the above-mentioned didactic design elements for an educational video, it is also important to take good care of the embedding in the learning process.

This means: especially videos that are used for blended learning scenarios or online-only teaching cannot stand alone – they need a learning context. Ideally, this is mapped in the learning environment, e.g., on the Moodle learning platform . But the video itself can also be designed accordingly.

The following efforts can be helpful for your students when using video in your teaching.

Accompanying material to the video that requests learning activities (example from Flipped Classroom course by Prof. Dr. Christian Spannagel, PH Heidelberg)

Videos in particular can easily create an “illusion of understanding” (i.e. watching the video creates the illusion of having understood the content). Therefore, learning activities that relate to the video are helpful to cognitively process the content of the video better.

Examples of linking the video to learning activities:

~ Cut deliberate pauses in the video, combined with a request

  • to make a summary in relation to the previously presented content,
  • write down questions that have arisen
  • or to answer the following guiding questions (which are named/ faded in) for themselves.

~ Provide guiding questions/ worksheet/ specific tasks/ test to the video, which are to be solved/ processed with the help of the video or are based on the video content

  • ensure as far as possible that students receive feedback on their completed assignments (e.g., possible in Moodle through tests, submission of the assignment, linking the assignment with peer feedback, controlled release of the sample solution via “prerequisites”)
  • assignments are also conceivable in which the students are requested to create products themselves; e.g. submit a short video showing an example of context XY that was explained in the video (as an individual or group assignment; here peer feedback and the later sharing of the student products in the large group is a good idea)
  • tasks that initiate a dialogue are also conceivable; e.g., “Choose one of the methods presented in the video and explain what you find positive/negative about it. Write a post about it in forum X.” (Forum setting possible, so that students do not see the contributions of others until they have written one themselves; also possible in combination with peer feedback)

~ Integrate quiz questions (with direct feedback) into the video (e.g., possible with Camtasia , H5P , or Panopto)

~ Create an interactive video that allows exploration of the video content instead of linear video playback (possible with H5P ); for example:

  • integrated buttons with additional information or for jumping within the video (e.g., depending on interest in subtopics),
  • integrated quiz questions, the results of which lead to other points in the video.
Example from Moodle course “ MaViT – Mathematical Video Tutorials” – here: clear learning units with videos and related material

This means that the video and its associated materials/tasks should be visually placed next to each other in the learning environment and relate to each other.

In Moodle, for example, this can be implemented through certain design options or Moodle activities:

  • Integrate the video links and associated materials into a topic section in the Moodle course and name them accordingly.
  • Work with indentations – set the video link and below it, indented, the corresponding test, forum, etc.
  • Use the description field of materials and activities in Moodle to make relationships clear.
  • Add a Moodle resource “page” and embed video there combined with associated guiding questions.
  • Use the Moodle resource “book” if, for example, a larger block of content is divided into several small videos.
  • Use the Moodle activity “Lesson” to link videos, text content and related quizzes.
  • Use the Moodle activity “Wiki” to present videos, e.g., with associated guiding questions, and to link different learning units with each other (this is useful if students are also requested to prepare content in the Wiki; then they already know the medium and format).
  • clear naming of the content of the video (“What is the topic of the video?”)
  • indication of the video length (“How much time do I have to plan for it?”)
  • state the purpose of the video (e.g., YouTube video for introduction, video as supplementary material to illustrate subject XY, video with teaching input as necessary preparation for the next (online) lecture session)
  • date by which the video should be watched, if relevant
  • set a fixed rhythm regarding the availability of the videos and, if necessary, accompanying tasks and opportunities to clarify questions
  • Indication of which materials/ tasks belong to the video (if available)

Tip: In Moodle, information on video length etc. can be easily added by activating the description field for the material (tick in the settings, e.g., for the Moodle resource “Link/ URL”) and typing in the information. This will also display them on the Moodle course page (see attached picture).

Example of orienting information when integrating video into Moodle course

Where/ when/ how are questions answered that arise when watching the videos?

Examples of how questions about the content of the video can be addressed.

  • Provide a forum – either for each video, e.g., in each theme week, or one for the whole semester.
    • In doing so, indicate who will respond to questions in the forum and whether you expect students to help each other in the first instance.
    • Make it transparent in which time slots answers can be expected from the tutors (e.g., during a day, Mon – Fri 8 a.m. – 6 p.m.).
    • For single forums for each video: Clearly name the forum associated with the video and indicate whether the forum will continue to be regularly monitored beyond the current theme week.
    • For example, in the case of tutorial videos, it is also worth requesting that students indicate the minute in the video to which their question relates.
  • Address the questions in the next (online) lecture session.
    • Communicate this approach to your students – both orally and in writing in the learning environment.
    • Establish this as a fixed rhythm, e.g., at the beginning of each session, questions about the previously provided video are clarified.
    • You can collect the questions in advance via Moodle, e.g., via the activity “Hot Question” (in German: “Nachgefragt”) or via an Etherpad. This way you have time to prepare and it is transparent for the students which questions will be discussed.
  • Provide supplementary learning material in response to the questions that have arisen.
    • e.g., another short video in which you address the unanswered questions (collected in the forum, via Etherpad or via the “Hot Question” activity)
    • It is best to establish a fixed rhythm here as well, e.g., questions can be submitted until time X, and at the end of the theme week you provide further explanatory material according to the questions.
  • Offer a regular online consultation to discuss specific questions about the content from the current video.
    • If necessary, organise this in small groups, e.g., by offering different time slots on an online consultation day (e.g., with the “Scheduler” in Moodle), in which the students can register.
      The division into small groups can make it more convenient for the students to dare to ask their questions.
    • Communicate that you are creating the framework for clarifying questions in this way.

Use external videos or prefer your own (self-produced) videos?

  • Self-produced videos can cause more effort, but are often more suitable for the course. Students mainly want “internal” videos on learning content or at least recommendations from lecturers for “external” videos and then consider these to be appropriate.
  • The use of videos from other sources requires more or less intensive research, including a content check. However, they are often well suited as supplementary learning material to illustrate/explain or as an introduction to a topic to arouse interest/curiosity. Ideally, try to find videos that have been published as Open Educational Resources (OER) or at least under an open Creative Commons (CC) licence.

Find Open Educational Resources (OER) under CC licence

Screenshot von https://www.youtube.com/playlist?list=PLzEHsvByN7KSR79eVb0-84133fVN31lxv
Picture: Aalto Online Learning (Aalto University)

Short Video Series on Educational Video Production

Aalto Online Learning from the Aalto University in Finland offers a video series for educators who are creating their videos for the first time and need help to get started or who have made some videos before but would like to learn more about best practices and enhance their video production skills. The focus is on the conceptual design.

Video playlist on YouTube