
Restrict access in Moodle
Restrictions allow teachers to link access to an activity, course section or work material in the Moodle course to certain conditions. Students must fulfil these conditions before they can gain access to the blocked course content.
Activating Restrict access
Access restrictions can be activated for all work materials and activities within a Moodle course room. They can also be set for entire course sections. As soon as you create a restriction, the selected course content will only be visible to students if they fulfil the set restrictions.
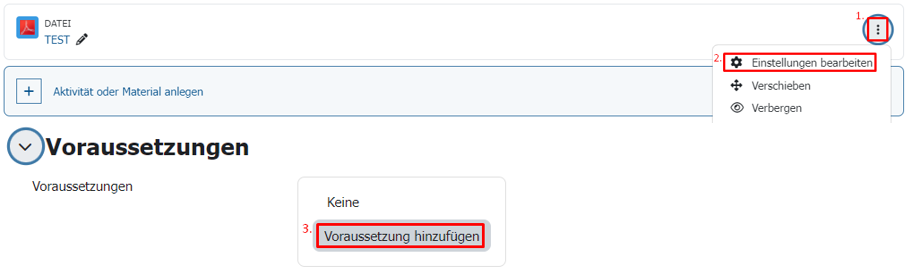
To create a new restriction, you must first activate edit mode by clicking on the Switch on edit button at the top of the course room. Now navigate to the activity whose availability you would like to restrict. Then click on the Edit settings sub-item in the Edit drop-down menu to the right of the selected course activity. This will take you to the activity settings.
Scroll down to the Restrict access sub-item and click to open it. You can now select the Add restriction button (see figure “Add restriction”).
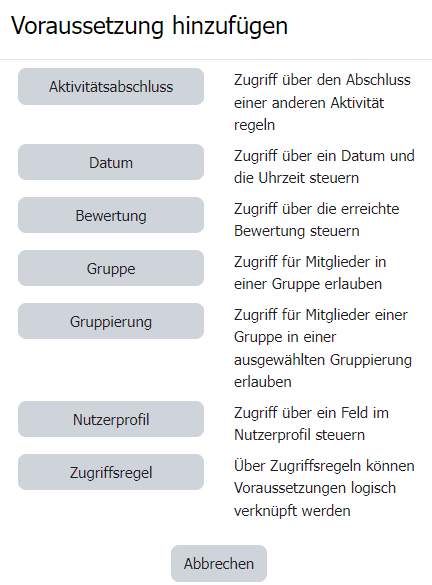
Clicking on this button will then take you to the overview page of the selectable restrictions. Here you can now select the desired restriction and then configure it as required. Further restrictions can be created using the Add restriction button.
You can then return to the course room via the Save and return to course button.
Note on multiple restrictions
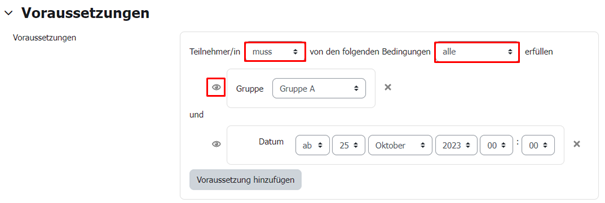
Please note that when creating multiple access restrictions, you must choose whether the students must fulfil all the restrictions set (AND condition) or whether it is sufficient if at least one restriction (OR condition) is fulfilled, see the “Configuring restrictions” screen.
Visibility
There is also an eye symbol in front of each newly created restriction. If the eye is open, students who do not fulfil the respective restriction will see the activity highlighted in grey in the course room. The Restrictions that they must fulfil in order to unlock the blocked activity are also displayed. You can deactivate this setting by clicking on the eye. The eye symbol then appears crossed out. In this case, students who do not fulfil the set restrictions will not see the blocked activity in the course room. If more than one restriction is defined for an activity, the closed eye will “win” in case of doubt.
Examples of use
You can find more examples of Restrict access in Moodle in the Moodle Docs.