
Setting Up a Declaration of Consent for Students in a Moodle-Course
Any materials provided by lecturers on Moodle may only be used within the context of the respective course.
If students need to be explicitly reminded of the intellectual property rights of lecturers and third parties within a Moodle course, a consent agreement can be implemented.
Note: Generally, students that use the Moodle system of TU Darmstadt must confirm the privacy policy, which also mentions the protection of the lecturers intellectual property.
Consent Agreement Using “Completion tracking” and “Restrict access”
There are various methods to set up a consent agreement. Here, we introduce a relatively simple method that combines the options of “Completion tracking” and “Restrict access”. An information text is placed in the Moodle course room and must be confirmed by the students. Only then do students gain access to certain materials (See screenshot “Restricted View”).

1. First activate Completion tracking in the course settings.
- Open the course settings in the menu bar at the top of the course.
- Set the option “Enable completion tracking” and “Show activity completion conditions” within the “Completion tracking” section to yes.
2. Then place the information text in the Moodle course.
- To do this, activate the editing mode using the the “Edit mode” toggle in the top right and create a Text and media area (“Add an activity or resource” > “Text and media area”). This text area is best placed in the first section of the Moodle course.
- Insert the information text for students into the text area. Under the “Activity completion” section, set the “Completion tracking” to Students can manually mark the activity as completed. Then click on “Save and return to course” to display the text and media area in the course. You might need to drag and drop it to the correct location.
- In this example, we use the following text:
The contents and materials of the course are protected by copyright. Recording, distributing, or publishing videos, texts, slides, etc., is prohibited. Contents must not be shared with unaffiliated third parties. In case of violations, you are personally responsible for any legal infringements.
By “checking” this section, you agree to the above statement.
3. Next, add a restriction to the materials you want to protect via the corresponding Restrict access section.
- Go to the settings of the respective material (Edit mode > Click the three dots next to the material > Select “Edit settings”).
- Scroll down to the “Restrict access” section and expand it.
- Add a new restriction by clicking the button Add restriction.
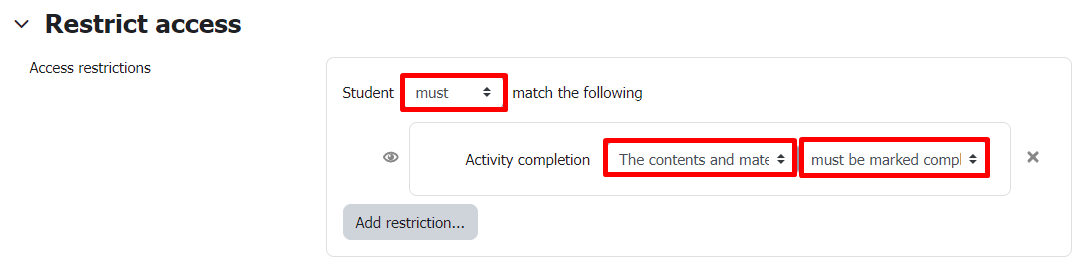
- Select “Activity completion” and apply the following settings (See screenshot “Restriction”):
- Keep the default setting “Student must match the following”.
- In the first drop down under “Activity completion”, select the formulated information text.
- Keep the following drop down “must be marked complete”.
- Finish by clicking “Save and return to course”.

Now, a text field with the consent agreement will be displayed to students in the course room (See screenshot “Consent Agreement”).
Once confirmed by the students, they will have access to the respective materials.
Alternatively, instead of a text area, you can use a text page. This places the consent agreement on a subpage, saving space on the main course page.
Furthermore, you can restrict not only individual materials or activities but also entire sections.
Alternative: Consent Agreement Using “Choice”
If you prefer a more binding method of obtaining consent, you can use the “Choice” activity. For this, we refer you to a public YouTube video by Dag Klimas (video is in German): „Wie kann ich eine Zustimmung 'verbindlich' einholen? – Moodle 3.9“
Note: The video refers to an older version of Moodle but is still applicable. The settings for individual materials are now found through the three dots next to the respective materials in edit mode (”Edit mode" toggle in the top right).