Functionalities of the Atto-Text-Editor

The Atto text editor can be used in Moodle for writing texts. The editor behaves similarly to Word or LibreOffice and has all kinds of possibilities to design a text.

Writing Texts on Moodle

To write text in Moodle, you can use the standard text editor “TinyMCE” or the Atto text editor.

Tip: If you prefer the Atto text editor as your default text editor, you can set this for yourself by clicking on your profile picture at the top right and then selecting Preferences > Editor Preferences.

Accessing the functions of the Atto text editor

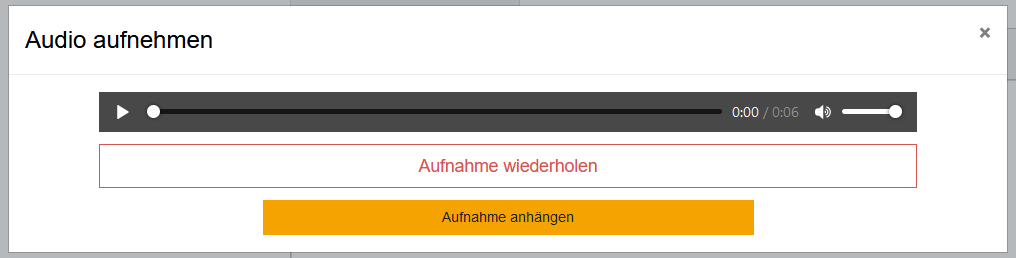
To write text in Moodle, you can use the Atto-Text editor. The editor includes a toolbar with which you can design your text, insert images, or embed a link. In addition, it is also possible to enter and upload audio and video recordings directly via the editor.

Here is a brief overview of the functions offered by the Atto-Text Editor toolbar:

Collapsed toolbar of the Atto text editor

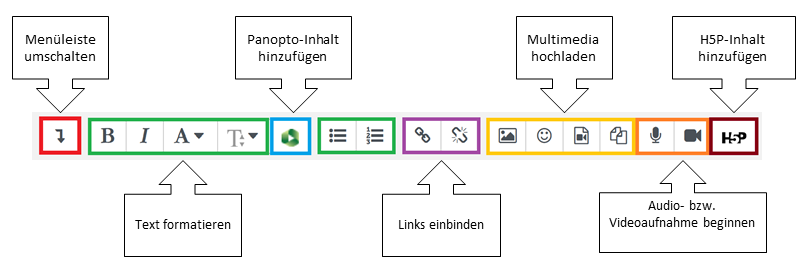
At the beginning, the editor is always shown in the standard display. You will only see a toolbar with functions for, for example, designing the text, changing the text structure, integrating links, or uploading multimedia.

If this view is not sufficient and you would like to edit your text with further functions, you can open the extended view of the editor by clicking on the arrow symbol on the far left of the editor bar (switch menu bar).

Fully expanded toolbar of the Atto text editor

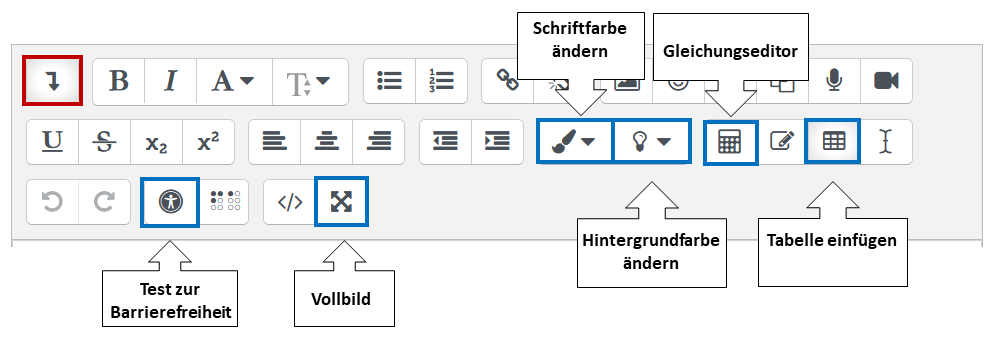
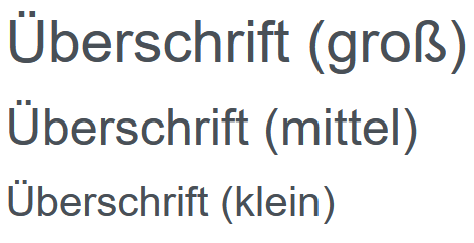
This provides you with a variety of new functions to modify your text. In the following, some symbols are explained in more detail and illustrated by examples. These include:

Headings
Headings

To format a text, click on one of the three icons in the toolbar of the Atto-Text Editor (see screenshot Collapsed Toolbar of the Atto-Text Editor).

Marking text bold

To highlight a text in bold, click on the B in the toolbar.

Marking text in italics

To mark a text in italics, please click on the I in the toolbar.

Inserting heading

To add a heading to your text, click on the A in the toolbar. A selection of headings (see screenshot Headings) is now displayed.

Changing font size

To adjust the font size of your text click on the T in the toolbar.

Adding bullet points or numbering

To add bullet points or numbering to your text, click on one of the two icons (see screenshot Collapsed Toolbar of the Atto-Text Editor) in the toolbar.

You have two options here: you can number your text, and you can add bullet points to your text.

You can add an audio or video file with the editor by clicking on “Insert or edit audio/video file” in the toolbar (see screenshot Collapsed toolbar of the Atto-Text editor under Upload multimedia).

You can add an image using the editor by clicking “Insert or Edit Image” in the toolbar.

You can add Panopto content by clicking on “Panopto” in the toolbar. For more information on Panopto, click here.

Please also make sure that the material you want to upload is not larger than 50 MB.

With the help of the Atto text editor, audio and video files can be recorded and uploaded directly in the editor window. To start an audio or video recording, simply click on the corresponding icon in the toolbar of the editor (see screenshot “Collapsed toolbar of the Atto text editor”).

Starting a recording

After clicking on the Start recording button, a small pop-up window opens in the top left corner of your browser's address bar with the headline “Should moodle.tu-darmstadt be allowed to access your microphone/camera?”. Click Allow here to start recording.

Stopping a recording

After finishing recording, you can play the recorded file in the editor window and start a new recording if necessary. Once you are satisfied with the result of your recording, you can embed the created file directly into the text field of the Atto editor by clicking on the Attach recording button and save it (see screenshot “Save recording”).

Save Recording
Save Recording

Note: The prerequisite for starting an audio or video recording is that the corresponding recording devices are correctly connected and configured on your PC. Otherwise, when you click on the Start recording button, you will see the error message Input device missing. Please also note that recording audio or video files via the Atto text editor is only possible in the browser and not in the Moodle app. The total length of each individual recording is limited to two minutes.

The audio or video recording function of the Atto text editor can also be used as a submission format for Moodle tasks. For more information about creating tasks in Moodle, see our FAQ article Activity Task . The submission type “Text input online” is intended for submitting audio and video recordings.

To integrate H5P learning content with the Atto editor, click on the “H5P” symbol in the toolbar. Then click on “Search repositories” and select the desired H5P learning content from the “Content store.” For all further information about H5P learning content, click on h5p.

To express mathematical formulas, the Atto text editor has an equation editor. Clicking on the calculator symbol (equation editor) opens a window with various options for integrating mathematical elements into the continuous text.

The top field contains mathematical expressions such as operators, arrows, Greek symbols and formulas. With a click, these are displayed in the equation preview at the bottom.

If you have experience with TeX , you can edit the notation in the middle section.

The selected expressions are displayed in the equation preview. The arrow marks the place where the next element is inserted.

The Atto text editor has some shortcuts with which you can edit your text using the keyboard. The table below gives you an overview.

Create a table in the Atto text editor

If you want to add a table to your text, you can also do this with the Atto editor. The Shortcuts table in the previous section was created using the editor and is used below as an example of creating a table in the Atto editor.

In the extended toolbar you click on the table symbol (Table) and an Edit Table window opens. Here you have the option to select a title and the position of the heading. In addition, the format, i.e. the number of columns and rows, can be defined. In the lower area you will find the available settings for adjusting the table layout. Under Frame it is possible to select the default theme or the Around the table or Around each row option. If you choose the latter, you have additional settings available, such as changing the frame type, frame thickness, color and table width.

Creating a table in the Atto text editor

The Shortcuts table from the previous section was created with the settings shown in the image to the right.

After the table has been created, the desired values can be entered in the corresponding rows.

It is also possible to subsequently edit the created table, for example to insert additional rows or columns. To do this, simply click in the desired location in the table and then select the table symbol in the editor bar. The available editing options will now be displayed here.

Coloring text

To color a text, you can select both the font and the background color by clicking on the brush symbol (font color) or the light bulb symbol (background color) in the extended editor bar.

Accessibility test

To ensure that the text is published without errors, you also have the option of carrying out an accessibility test in the Atto editor. This checks the color differences between the foreground and background colors and issues an error if necessary. To run the test, you simply have to click on the man icon (accessibility test) in the expanded editor bar.

Enlarging text window

If the editor's text window is too small and confusing for you, you can open it in full-screen mode by clicking on the full-screen symbol on the far right in the extended editor bar. You can exit full-screen mode again by clicking on the full-screen icon again.