Activity Fair Allocation

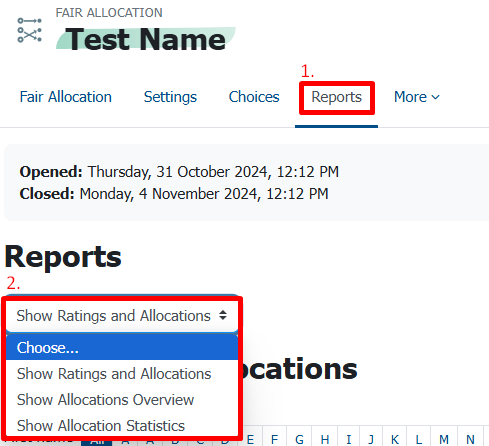
With the “Fair Allocation”, students can be automatically assigned to multiple groups. The grouping is handled by an algorithm based on participants' preferences or prior knowledge. Unlike the “Group Choice” activity, the first-come-first-serve method is avoided, resulting in fair and equitable group assignments. Teachers can also manually adjust group allocations if needed.

Create Activity

To create the activity, switch your course to editing mode and click on “Add an activity or resource”. Then select the “Fair Allocation” activity.

First, give the activity a name under “Name of this Fair Allocation”. Optionally, you can add a description that will be displayed on the course page.

Then, you can set various options for voting and selection strategies you wish to offer participants, as well as the voting period (see screenshot “Voting Options”).

  • Rating strategy: The rating strategy determines how participants can express their preferences for a selection. Options range from a simple “Accept/Deny” approach to a points system. Below is an overview of each strategy.
    • Accept-Deny: Participants can decide whether to accept or deny each choice.
    • Accept-Neutral-Deny: Participants can decide whether to accept, deny or remain neutral toward each option.
    • Likert Scale: Participants can indicate their preference for each option on a scale from 0 to any positive integer set in the settings. The higher the number, the higher the preference.
    • Give Points: Participants can allocate a certain number of points to indicate their preferences.
    • Rank Choices: Participants can order the choices based on their preference. The first choice indicated the highest preference.
    • Tick accept: Participants check boxes to indicate acceptable options.

  • Rating begins at: This date determines when participants can begin voting.

  • Rating ends at: From this date onward, participants will no longer be able to vote.

  • Estimated publication date: The expected publication date serves purely as information for participants.

In the section “Strategy specific options”, you can adjust additional options based on your chosen rating strategy. Finally, click “Save and display”.

To privide your participants with options, click on “Choices”- Here, you'll see a list of all previously added choices. To create a new option, click “Add new choice” (see screenshot “Choices”).

In the settings for each choice, you can specify a title, description, and the maximum number of participants that can select that option.

Choices

Choice Settings

Modify Allocation
Modify Allocation

Once the voting phase ends, you can initiate the algorithm to assign participants.

To do this, click “Run Allocation Algorithm” under the “Modify Allocation” section (see screenshot “Modify Allocation”).

Afterwards, you have the option to generate groups from the distribution.

Once the distribution is automatically created, you can manually edit it if needed by clicking “Manual Allocation Form” (see “Modify Allocation”).

In the final step, you can generate Moodle groups from the allocation.

You can review the distribution by selecting the “Report” tab (see screenshot “Report”). The options for the report include:

  • Show Ratings and Allocations
  • Show Alloctations Overview
  • Show Allocation Statistics
Report
Report

Examples

Dummy Allocation